Ways I can afford to spend time sharing life with you

Please, visit my Etsy shop at www.etsy.com/shop/EarthshaperArts to browse my art or order a custom painting on wood, watercolor paper & canvas. This site contains affiliate links. See the declaimers at the bottom for more info.

Friday, September 21, 2018

Art Journal Series: Week 2, Drawing faces

Art Journal Prompt: 5 People Who Make You Smile MOST.

     I don't know about you but, wow, is it not a challenge to pick only FIVE people who make you smile. I have lots of smiles in my life and am grateful for every one of them. I chose the people who really give me peace and unconditional happiness. People who I don' have to do anything to please. Isn't funny how those become the people you want to do the most for? Sadly, we don't always put them first. We tend to put our efforts in to the relationships that demand the most from us such as our boss, our kid's coaches or teachers, our discontented peers or that family member or friend who seems to always slip their critical spirit into your life.
     It is time to refocus our time and efforts on those who we love to love.  Relationships don't always have to be hard. Sometimes they are gut level. You just know when they walk into the room that you are safe with them. They simply make you smile. Always remember Philippians 4:8 when you are anxious or busy.  Life is all about your focus.

     My first three were easy, my husband and kids. These three have seen the worst of me and inexplicably they still love me. Not in an I-live-with-you-so-I-have-to-love-you-way but in a wonderful filling the air around us way. I am so BLESSED by them.
     The next two were harder to narrow down. I thought about my parents who I love so much I moved in across the street from or  my two best friends who have stuck with me forever. I also have a couple brothers and sister-in-laws whom I would love to devote more time to. But it was the pure unconditional love of two teenagers that my heart rested on, my niece and my friend's daughter.  They have become bright shining places in my life that I cherish. Every time I see them I get a hug. Yes! from teenage girls! I thought they would grow out of this and leave me behind but I am still blessed by their love even while they are giving their own mothers the typical growing pains. These are the five people I want to focus my efforts on most in the busy season to come.

So here is my journal page:
 Art Journal Prompt 2 by Earthshaper Arts: 5 people that make you simile

Week 2 Art Technique:

 Drawing Step by Step Face

    Now before you get all self critical about your drawing skills, I want you to breathe and relax. Remember this art journal is just yours. I thought long and hard about what technique to demo this week (exactly why this week is being published late). There are many ways you could do this page that doesn't require drawing. Such as a photos collage, going back to last week's technique. Or silhouettes which is just cutting out a profile photo and tracing around it on colored paper and cutting that out. But I wanted to draw my 5 people and after seeing my niece this weekend I thought I would create this demo for her. So this is dedicated to her. 

      I am going to break it down real simple and teach you some of the tricks I learned in art school to help you get the basics of drawing the human face. The human face and body are surprisingly geometric and symmetrical.  Check out Leonardo DaVinci's Vitruvian Man. It shows how perfectly mathematical the human form is. The things that make us each look unique is how our proportions deviate from perfection. Isn't that poetic? So your little flaws are what make you beautiful YOU!

So let's begin....

 How to draw faces in 9 steps by Earthshaper arts

     I will break this down into less than 10 steps with illustrations. I will be using a few stencils to get you past fear factor. You can buy the stencils on Amazon or at a Craft Store but if you look around your house it is likely you can find objects to trace around for consistency. The alternative to this is Practice Practice Practice. Practice drawing general shapes first straight lines, circles, ovals, and cubes which are the essential shapes in drawing people and most things for that matter.

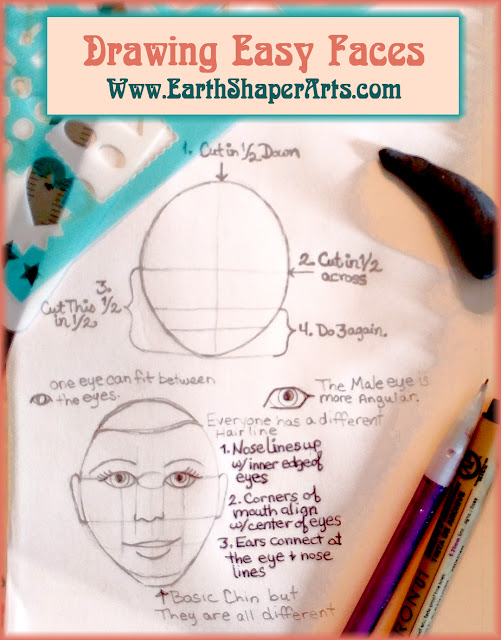
Drawing Easy Faces: Step 1

The Oval. 

Ovals can be tricky and intimidating but they are essential to drawing faces.It is the basic shape you start with. So when you are starting out, it is fine to start with stencils or tracing. An Easter egg that opens length wise is great or a cardboard tube that you squeeze in the middle slightly can work. You can always print your shapes on card stock and cut them out to trace around if you want to be really precise. However, precision is not that important at this stage. Ideally you will grow in confidence and hand eye coordination and will soon be free handing. 


Drawing Easy Faces: Step 2

Basic Proportions

 Drawing Faces: Basic proportions
The fun thing about the face is there are easy to remember measurements for laying the different parts out. First you divide the face in Half from top to bottom. This line helps you make the two side of the face symmetrical. That means they are mirror images of themselves. Similar to how you fold a piece of paper in half to cut out a valentine heart. 

Then draw a light line across the face HALF way down. All these guide lines need to be very light so you can erase them later. Now this line is the eye line believe it or not. We do not have monkey or bird brains. We have large brains on the top of our heads so leave plenty of room for it or your faces with not look very smart. 

Then divide the lower half of the face in HALF again. This is the nose line. 

Then divide that bottom fourth in HALF AGAIN!  Ha. That is where the mouth with open. It doesn't seem like much room but trust me.

 Drawing Easy Faces: Eye Placement & SizeDrawing Easy Faces: Step 3

The Eye Placement

When placing the eyes is good to imagine a third  eye between them. I used this stencil to demonstrate. You don't really need the stencil but a ruler or small round object might be nice just to help you in making both eyes the same size. Matching eyes is one of the most common  trouble spot for new artists. So much so that I have noticed many using a simple black dot for eyes on Etsy and in comics. Those are options too but I like to simply measure for accuracy.  
      You will see below that I generally use a simple circle to draw the edges of the iris. The bottom of the iris usually shows as well unless the person is smiling big or squinting. But the top almost never shows. 

 Easy eyes
Place the iris directly on the eye line and then draw the lids around it. Extend the ends of the top lid arch just beyond the bottom lid to indicate the tear duct and the corner crease. 

The pupil is just a smaller circle inside the iris. Color the pupil in black but leave a tiny moon shape along the edge of it as shown below. 

A quick note of variations. In General, the masculine face and features are more angular and contain more straight lines than the curved feminine lines. This includes the eyes. Their eyelashes are usually not as long and the lips not as full.
A few very small changes can make a huge difference. 

Drawing Easy Faces: Step 5

Nose Placement and size

The nose is placed where the second horizontal line and the vertical line meet. The most simple nose shape is just a slight curve. If you want to get more specific than that you can add the edges of the nostrils something like this င◡၁ 

How large or pointed the middle curve is can really add personality to the face. 

The general rule about the width of the nose is that the nostrils should line up with the inside corners of the eyes. 

 Drawing Faces Nose And Mouth AlignmentDrawing Easy Faces: Step 6

Mouth placement & size

The mouth rests on the final horizontal guide line you  drew. A vertical line drawn straight down from the center of the eyes indicates where the edges of the mouth should stop. 

The curved line drawn here is actually the inner edge of the top lip. 
A slightly more curved line above and below that curve will form the lips. 

Often the outer edge of the top lip is poorly defined or completely missing when drawing a masculine face because their lips are thinner than their estrogen filled counter parts. 


Drawing Easy Faces: Step 7

Ear Attachment & Placement

Ears are a very complicated body part. But given that few people pay much attention to them and the are often obscured by hair or shadows, the short hand is quite easy. 

The attach to the side of the face where you already have guide lines. The top curve extends just above the eye line and the bottom curve hangs just below the nose line. The bottom lobe sits closer to the face given that it is softer. 

Drawing Easy Faces: Step 8

Eyebrows

The rule for eyebrows is to line the inner edge up with the nostrils. The outer edge should fall in a diagonal line from the outer corners of the mouth and eyes. To form the arch correctly, the highest point in the arch should be above the pupil. 

Drawing Easy Faces: Step 9

VARIATION!!

 Drawing Faces with Variation

Now that you know all the rules BREAK THEM!

The things that makes faces so interesting to look at and draw is the never ending combinations of variations that make everyone look so different.  You can see it just in this very limited sketch of faces for my journal. In drawing this five people, most of whom are related, I learned that my husband always seems happy because his eyes squint more than the generalized version of an eye. My daughter's mouth is closer to her nose than usual. Which explains we her smile is so big and how she can touch her nose with her tongue. Ha! My niece has adorable dimples which are the tiniest marks on a page but make all the difference in the world in making her look unique. 

Drawing your favorite people can become a kind of meditation in which you grow closer to that person and learn more about them. It really is a practice anyone can pick up and benefit from. Good luck with your Journal. And please comment here or on my Facebook page about what you learned today or questions you have. 


Friday, September 7, 2018

Art Journaling Series: Week 1, Collage

     Last week I introduced Art Journaling with the promise to walk you through all kinds of journals and techniques. Oh My! Where to start? I decided to just jump right in with a 10 week journal prompt list. One subject a week that will get us right up to the crazy holiday season and be there to remind us of the people, places and things that bring us joy. Isn't that what we all need to recapture most in the midst of all the hustle and bustle?
 Art Journal Technique: Collage


So there are all kinds of journal prompt lists. My daughter who is also an artist does this once in a while when she is going through a creative block and needs something to draw. Her peers on Instagram post a list of one drawing idea each day related to a theme. No one expects a masterpiece for these quick exercises but is does get the creative juices flowing and keeps the habit of daily creativity ingrained in them. Journal prompts are also common for writers for the same reason.
     
     Since art journaling is less about skill and more about mindfulness these prompts may seem a bit more abstract. But the objective is the same, healthy habits and fostering daily creativity. If you have a place to keep all your journaling materials out and readily accessible you could feasibly complete these weekly prompts in just 5-15 minutes a day. Or if your schedule is less routine like mine do it all in one or two sittings. So lets get started.

Here is your prompts for the Pre-Holiday season 2018:

 Pre- Holiday Inner Happiness Journal prompts

     I completed a list like this a few years ago and can I just tell you how happy it makes me even today to look at it and be reminded where my heart really dwells. When all the noise of the media and advertising, success gurus and corporate bosses and even family and friends are telling me how I should act or feel, I look at this list and know who I really am and what truly makes my spirit happy. I am not saying to be completely selfish in this. Charity and serving others truly does feed our souls but we all have our own talents, our own pet causes, and our personal style. So, explore that. You can serve the world so much better when you are true to you!

WEEK 1 PROMPT: Top 5 life priorities to focus everything else on. 


     Years ago I learned that naming these and reminding myself of them often was a huge help in deciding what to concern myself with and what to let go. The world would have you believe that every little thing is important. And usually the squeakiest door gets your attention. It is OK to just let some doors whine while you take care of what is really important to you. This goes right back to the purpose of a vision board that I wrote about at the beginning of the year.
     So really think about these. Make them broad enough to really encompass what motivates you. If you feel like your career takes up all of your time decide why that is. Is it the accolades that you are seeking, for others to recognize you as an inspiration or a innovator in the field? maybe it is the field itself you are passionate about. You just really can't get enough of the subject that you working. Or maybe it is to live in a luxurious beautiful home. Then you could say that beauty and comfort motivate you. Maybe you work because you have a sick loved one to support or so that your children can have every opportunity possible in school and life. It's safe to say your priority is family. Maybe you work hard just because you believe it is the Right thing to do. Then one of your priorities should be a moral belief system of some kind. None of these are right or wrong. Only you know what motivates you. 
 Organize your collage clippings to save for later
I like to save every image and word the grabs me because I may want to do a collage again later and I don't want to have to keep all those magazines laying around the house. So I file the clips and toss the the magazine.

WEEK 1 JOURNALING TECHNIQUE:  Collage

   Since, this isn't mamsy pansy stuff we are thinking about here I picked a tried and true journaling technique for this week. One you have probably all done at some point in elementary school. The great thing about collage for this prompt is you spend a lot of time thinking about the words you are choosing to express your thoughts. I will admit that is prompt is pretty deep but I truly believe it belongs in EVERY journal that is concerned with your self expression, inner peace, or life goals. Shoot I even copy my priority list into every planner and calendar I start. It is key to living a life you choose and excel at. 

Materials: 
Magazines, ads, books, and newspapers you don't mind cutting
Scissors
Paste or mod podge
Your Journal
Optional: 
A few envelops
Markers, puffy paints, glitter glue, stickers
Scrap paper or drop cloth to apply paste over 

🖌Step 1. Collect all of your magazines, mailers, advertisement flyers, all that junk mail, even old books if you can bring your self to cutting them up. I am telling you advertisers know what motivates people better than anyone. And of course they use that info to sell you cars, jewelry, and makeup. Even medication ads have some great words that you can use to express your priorities in life. So any piece of copy with ads in it will be a resource for you. You can also find magazines at some recycling centers. Ours has a self for materials that can be reused. The thrifty teacher is well aware of where to get  old magazines in your area. 
Step 2: Roughly jot down what you think you five priorities are. 
🖌Step 3. Scan the magazines for imagines and the bold words that jump out at you most. This is very intuitive. Enjoy this process and don't be to rigid about find the exact words you jotted down. 
Step 4: Cut out those images and words for later. You can divide them into categories that fit each of your priorities and place them in a labeled envelope.  If you start finding certain images and words that you love but that do not fit your categories make a miscellaneous envelope and when you are done see if a new theme emerges. Perhaps that subject means more to you than you thought before. 
🖌Step 5: Arrange them in your journal on the first two pages (two pages facing each other is called a spread). I arranged mine by topic. I love using Elmer's disappearing school glue sticks because you can put a little dab of glue on the your pieces, place them on the page and they will stay if a breeze blows through. If you change your mind, you can gently lift the piece off and re-position it while the glue is still purple. 
Step 6: Glue them firmly down. This is where I like to have some scrap paper so that I can go all the way to the edge of the clips with my glue and not get the glue on everything. Some prefer Mod Podge both under and on top of their collage. It gives it a nice finished look. A word to the wise though. Do not use glossy Mod Podge in your journals. It will cause the pages to stick together no mater how long it has to dry. They do make matte Mod Podge I imagine this would not have the same problem but I have not tried it yet. 
🖌Step 7: If you feel like your final arrangement or images are a little to abstract for your taste, you can now go back and write your priorities right onto the page like labels. Or you can use alphabet stickers to really spell it out. Puffy pain or glitter glue can really make things stand out too.

Now you have the first two page spread of your Happiness Journal. I hope you will do this with us and maybe even post your results in the comments here or on my Facebook page. I would love to see how everyone's turns out and how different they are from each others. Really let your personality shine. 
  
This page may have affiliate links to help support the time and effort that goes into this page. That means that when you click on a link and purchase that items I get a small portion for suggesting that product. We appreciate every click and share.

Friday, August 31, 2018

How to Art Journal

 Art Journaling Series: part 1


                Have you ever wanted to start a journal but didn’t know where to start, what to write about, what to leave out? Ever start a journal and get overwhelmed by the details of life or been afraid it would be seen by your family or kids one day or the whole world if you ever had five minutes of fame? Trust me I have been there. I have been journaling in some form on and off since I was 10 years old. I know all the struggles but I have also reaped many of the benefits and that is what I want to share with you.

                Art journaling is a whole category of journaling that helped me overcome many of the pitfalls of traditional journaling. It simply means journaling that includes images. You don’t have to be an artist. There are lots for techniques that take little to no artistic training.  Though, it is a wonderful place to explore new art techniques and tools if you are artistically inclined.
                Journaling helps you make connections and give meaning to the events that happen to you and in the world around you. When done right it reinforces positive pathways in your brain and solidifies your values and world view. It gives you practice in reacting to the world in the way that you deem respectable and constructive. Too many times, however, my written journals have spiraled into rants that only escalated the situation in my own head. The beauty I have found in art journaling is that it is light on words and heavy on meaning. It is hard to get carried away in chronicling the details of an event when you only have a page or two to fill with images. It cuts straight to the emotions and meaning of the situation and keeps the personal defenses down.
                It turns out that this kind of journaling is healthy for your mind and body. The things you reflect on most you learn from and remember long term. All the other junk information that streams through your day can just fall away. According to Scientific America studies have shown that reflective, values focused journaling helps you cope better with stress, heal better, boosts your immune system, and may even raise you GPA in school. So that’s how I passed nursing school! Ha

So How do You Start?

                Honestly, there are no rules, but I have tried tons of ideas that I am happy to share. All of them will take WAY more than this one blog post though. So, I have made this a series that I will add to every other week between all the other interests I post about. I will share journaling ideas, prompts, tools, and techniques as well as my own art journals to encourage you.

First, Gather MATERIALS.


Of course, you will need a JOURNAL. My favorite is the Strathmore visual journal. It has a hard cover to protect your work. Thick pages that can take on about any kind of medium (that’s your pencils, paints, inks, markers, and glue) and it is spiral bound so it can expand with what ever you put in it.  
Drawing/ painting tools. Pens, pencils, markers, watercolor paint or craft paint, even crayons. The sky is really the limit here.
Collage supplies. For those that are not very confident in their drawing skills you will love this one. Gather your favorite magazines, mailers from your favorite stores, children’s books. And Glue. Some of my favorites are quality gluesticks, mod podge, and acid free double-sided tape. You might want a sponge brush to apply the glue but I find my finger and a damp rag to clean in off work just fine.
Alphabet stamps and stencils. Until you are more confident with your own hand lettering this is a good place to start. Stencils offer all kinds of possibilities and the stamps are great for memorizing things as well because you have to find each letter separately. You can do this by cutting words out of magazines too if you don’t have stamps yet.
A bag to keep your supplies in so you can journal anywhere. Availability will help you keep you journaling habit consistent.  My favorite is actually from an Indiana nonprofit organization called the First Chance Center. Their Envision line of bags are so sturdy and have tons of pockets and best yet they provide training and jobs to people with disabilities who otherwise may not have got a chance in the work force. 

Second, Decide on your STYLE.

                What purpose is it going to serve for you? Is it to encourage you, help you study something you want to know more about, to process grief or and illness, or to help you remember things, etc. My first art journal was in art school (duh) and was specifically to help me become a better artist. That evolved into a journal to capture my ideas. That was a pocket size one I carried everywhere with me. Then there were travel journals, and health journals and devotionals, and dare I mention, scrapbooking! That is the most common and well-known form of art journaling. So here is a list of types of journaling that I can tell you a bit more about.

🌿The Field Journal: This journal helps you perfect a skill or learn more about a subject. Think Audubon or DaVinci. They drew in journals to better illustrate their research.
✨The Timeline Journal: This is akin to the scrapbook. It tells a story about your life.
🌿The Travel Journal:  This can be one journal for each long trip or book of all the places far and near that you stay in, dine in, or explore.
✨The Devotional/prayer Journal:  A meditation journal in which you spend a set portion of each day in spiritual thought, be it through verse, quotes, prayer or gratefulness.
🌿The Garden Journal: Part planner, part record, the garden journal helps you remember what worked and what didn’t and in what season to do or expect certain things. It can also be used as simply another way to appreciate the garden and can help get through the doldrums of winter.
✨The Vision Journal: This can help you on the way to meeting a goal. It helps you visualize where you want to be, how you get there and records your little successes along the way. All the big motivational speakers suggest these steps but you can keep these all in one place with an art journal.
🌿The Health Journal: This type is more focused. Whatever area of your life you want to get healthier in, it is always helpful to keep a journal. In mental health, losing weight, finding food sensitivities, and so on using glyphs, stencils or stickers to log your new routines and celebrate each achievement along the way will make it more fun.
✨The Happy Thoughts Journal: My personal favorite. I will be including a prompt list for this one soon. In this one you fill the pages with things that make you smile, memories or great times, and the words of people who love and encourage you. With this just near by you can never forget how good life really is.

Finally, Just do it.

Remember you don’t have to share these with anyone else. So, if you start out a little clumsy, no worries. It’s all about the process. And I will be here to guide you if you need it. My next post will include prompts, more examples and simple techniques. I am super excited to share this journey with you hope you enjoy it too.
                To get notified every time I post add yourself too the Earthshaper email list. I promise I will not spam you  ‘cause I ain’t got no time for that either. Haha. Maybe, one post a week or less at this point but I would hate for you to miss them. Or you can like our Facebook page.

Tuesday, August 21, 2018

What's the Story with Barn Quilts?

The story of the barn quilt is vague and fairly undocumented until the early 2000's. Some say it began in 2001 with an Ohio lady that started the first barn quilt trail to boost rural tourism. More on those later. Some say it was a Dutch tradition that has been around for hundreds of years. Others say they were used to mark the underground railroad. As with many conflicting histories, it was most likely a combination somewhere in the middle.

 Pennsylvania Dutch Barn starThe Pennsylvanian Dutch had a tradition of painting stars or flowers on their barns. These became popular around in the 1830s when paint was affordable enough to use on larger areas. However, the symmetrical and often geometric designs came from the smaller motifs already used on marriage and birth certificates, around the home and, yes, from their quilts.  The symbolism in these designs was steeped in superstition particularly for farmers, as most life and death professions depend to a degree on luck. Some symbols that makes sense are eight pointed stars for abundance, rosettes to protect from famine, pomegranates for fertility, oak leaves for strength and tulips for faith. Later they became even more specific such as a horse to protect livestock from disease. 

 Art history board
As superstition became more and more frowned upon by the puritan neighbors the designs became more decorative and personal. They started to serve as landmarks to draw the attention of tourists which revived the art that was threatening to die out.

It is easy to make the jump from the quilts and folk art of the past to the quilters and folk artists of today. 

What's the Story with Barn QuiltsThe Modern Barn Quilt began as an enlarged version on a single block from a real quilt. These were often made to commemorate a heritage of quilting such as design passed down from a grandmother. Since elaborate quilting traditions have deep roots in our European ancestry, it stands to reason that it would surface in this way as Americans have become so interested in genealogy and the cultures that once defined them.    
As always we began to put our own spin on the barn quilts and today you can find artisans creating everything from enormous displays of precise optical illusions and color plays to quaint shelf size decorator items to bring that farmhouse chic look into the kitchen or nursery. 

This variety is what make the Barn Quilt Trails such a fun and enriching way to see the countryside.  A Barn Quilt trail consists of a map that is put together of a county or region that connects all the barn quilts in view from the road.  It is a great way to increase agritourism in the less population dense farmlands of America. Many of the stops on the maps lead the traveler to little farm stands, U-pick orchards, wineries, small business owners, and craftsman's shops. On the way it helps one gain an appreciation for the beauty of the land and work that goes into some of our basic necessities. 

If you know of a barn Quilt trail near you please comment or email me. I would love to put together a list that that anyone can find a trail near them. 

Here is a List of Barn Quilt trails I have found as of Aug 2018. 

Ohio
Gibson County, Princeton IN 
Miame County Peru IN/
LaGange County Shipshewana, IN
Illinois 
Kentucky
Kentucky map of Barn Quilt trails
Tennessee

Commission your own Barn Quilt for your Farm, Shed, Small business, Home, or mailbox at Earthshaper Arts on Etsy.  


Resources:
http://www.wikiwand.com/en/Hex_sign
https://hexsigns.com/pages/hex-story
http://www.brandynaugle.com/hexsiglns.htm

Thursday, August 2, 2018

Arizona Indian Reservation Mission Trip

5 tips to keep your light bright after a Mission trip
Our mission team's feet (to properly protect the identities of our travel worn friends, lol)

At Least Once in a Life Time

      My husband, 15 year old daughter and I just got back from a short term mission trip in Arizona. If you haven't been a mission trip in which you were immersed in the culture of less fortunate people then you should go at least once. It is an eye-opening, change your whole world view, growth experience. The longer you can stay and the more immersed you can be the better. Walking in the shoes and getting to know an oppressed or disadvantaged people makes you so much more humble and  appreciative of all we have in life.  It destroys the stereotypes and pre-judgments that separate us.
     Surprisingly the hard part of going on these short term missions is to keep the fires of passionate service burning when you come home. You can spend nearly a year planning, fundraising, recruiting, talking it up to everyone you know till you finally get there to spend an amazing week or two serving and learning everyday. I really believe that helping each other is an intrical part of our human make up, so when we set aside the time to do it we are filled up by it.  Therefor, it makes since that we may experience some withdrawals when we return home to our seemingly self centered and secular lives after.  We may even become irritated and disenchanted by the "spoiled" whines of the cluelessly blessed society around us. 

So how can we fan the fires of service and fill the void when we return from a Mission?

1. Process the Experience.

Continue journaling or Start Now if you didn't journal during the trip (I'll admit I fell asleep on mine a few nights). If you had any kind of culture shock learning your new culture, you will likely have reverse culture shock coming home. With your newly opened eyes you will see things about the privileged world that you simply accepted before.Process those emotions between you and God so that you can respond with Grace when you are confronted with actions or attitudes that offend your new world views. 


2. Plan your Responses.

As 1 Peter 3:15 says, Be prepared to give an answer for the reason for your hope, Also be prepared to answer those who ask about your trip. This is part of your witness and people are often interested but don't know what to ask. Be prepared to describe the culture both their strengths and struggles, how you physically helped them and what they taught you.  If it flows with the conversation relate a spiritual victory that happen there. Close with how you see or want to do things differently now that you have had that experience. Most importantly keep it simple, personal, and meaningful to you and it will more likely mean something to others. If this want to know more you can set a time to meet and talk.

 It is always good for the team or representatives of the team to set up a time to present  the church as well. This is not a time for the team to "toot their own horns" as some may see it but a time to encourage the congregation that the whole church's efforts have a far reaching impact. Read  Acts 14:27 for the example. If it was good enough for the first churches it is good for us too. 

3. Thank your Supporters.

The thing about missions is it takes the whole church. Those who have the time seldom have the money and those with the money rarely have the time. God blessed us each with different gifts, teachers, encouragers, planners, and some have the gift of money management. Money is not the root of all evil as we may tend to think when we walk with the oppressed. The Bible says it is the LOVE of money that causes evil. Those who give money, encouragement, networking, and prayers are giving of their gifts just as much as the teachers and missionaries. So wholeheartedly thank them however you can. 

4. Stay Connected. 

While you were serving hopefully you made some relationships and connections with some of your teammates, your mission hosts, and those you were serving. STAY CONNECTED with them. Make a coffee date or hiking trip with the teammates you especially bonded with. Only they can truly relate to your experience. Write those you leave behind, be it e-mail, snail-mail or Facebook. Sign up for the mission's news letter for updates. Only they can give you continued insights to the needs and answered prayers of the place you left part of you heart in. 

5. Finally, Make it count at Home.

Earth shapers make a difference where ever they are. In big ways but most mostly in small everyday ways. Join a local group that serves an area you particularly love on you trip. My husband's passion was teaching the kids but also growing food to foster independence. So he started a kids gardening club on some unused land at our church. All the extra food goes to the local food bank. The leader of our group has long been a key player in a feeding and pray outreach to the homeless in our town called the Starfish ministry. I chose to write this blog in addition to other things. 

Most of all, let it change how you interact with people everyday. Poverty is a hidden illness that people every community face. It has many symptoms but you never really know the full extent of the struggles some people deal with everyday. And while the poor may always be with us, we can help the symptoms hurt less and remind them that they are of value too, by us and their maker. 

Tuesday, June 19, 2018

Dolmas: Grape Leaf Wraps

While Waiting for the Grapes Recipe (Dolmas)

        When growing our own grapes there was a harsh reality this little tree-hugger had to come to terms with; healthy grapes means less leaves. Bringing myself to pull off all the enormous, sprawling leaves and whimsically reaching, but fruitless, vines took a leap of faith. I couldn’t believe this much waste could have even been a practice of the ancients, till I remembered an authentic Greek restaurant called the Greek Islands that we once went to in Indy back before we had our own kids. They had a belly dancer and everything! The dish I ordered was Dolmas, which looked like a Greek style lettuce wrap, off the menu. So I put my Chef Hubby to work making Dolmas with our grape leaves for the family. The results were even better than I remembered, as food from our own garden always seems to be. (Am I wrong? ha)


Turns out you can even purchase preserved grape leaves if you don't have grape vines of your own. This may be a new skill to learn on down the road.

Ingredients:
Wraps:
12- 4 to 5 inch wide grape leaves
4  cups water
1 cup salt
Rice:
1 cup white rice
1 ¾  cup water
1 tsp salt
2 Tbsp butter
½ cup golden raisins
Meat:
1 lb ground beef or lamb
1 tsp cinnamon
½ cup diced onions
2 thinly sliced garlic cloves
½ tsp red pepper flakes
¼ cup chopped fresh dill weed
Garnish:
Finely crumbled feta cheese
Black pepper
Olives
Pepperoncini
Approximate time: 35 minutes
Directions:

Pick grape leaves with no insect damage, no chemical spray, 4-5 inches wide in late Spring, sometime in May or June. Avoid fuzzy thick leaves. Wash in cold water and drain thoroughly.

Blanch the leaves in a brine of 4 cups water with 1 cup salt. Bring brine to boil. Drop leaves 12 at a time into boiling brine. Bring brine back to boil and remove leaves immediately and immerse in ice cold water. This will set the color in the leaf better. Dry off leaves and store in olive oil.

Make stuffing mixture. Start 1 cup of rice, 1 ¾ cup water, 1 tsp salt, and 2 Tbs butter cooking in rice cooker. Meanwhile cover ½ cup golden raisins in hot water and soak. Brown 1 lb ground beef or ground lamb seasoned with salt and pepper and 1 tsp cinnamon, ½ cup diced onions, 2 thinly sliced garlic cloves, and ½ tsp red pepper flakes. Drain ground meat and set aside. When rice is cooked add meat mixture, ¼ cup chopped fresh dill weed and raisins with juice in rice. Mix well.

Lay out grape leaf and put 1/3 to ½ cup rice mixture and finely crumbled feta cheese in center of leaf. Sprinkle with lemon juice. Wrap up like an eggroll or burrito. Put on plate and garnish with a salad of mixed olives, med size crumble feta cheese, slices of pepperoncini peppers, diced tomato, diced cucumber, diced red onion with a dressing of salt, pepper, olive oil, ½ tsp chopped dill weed and red wine vinegar or lemon juice.


Thursday, June 7, 2018

The fruit of the vine

Reflections on last fall's harvest

also posted on Survivalists In Suburbia
Written by Amber Stewart


The Fruit of the Vine

“I am the true vine, and my Father is the gardener. He cuts off every branch in me that bears no fruit, while every branch that does bear fruit he prunes[a] so that it will be even more fruitful." John 15:1-2

I have always wanted to grow grape vines. Not because I am particularly found of grapes but because this discipline is so often mentioned in scripture in both the old and new testaments. I wanted to understand these many metaphors better, to understand the maker and lover of my soul better.

In the early years of our little family, I must have pictured God, the gardener, as this quite spirit drifting lightly through the flowers like a breeze. He tenderly whispered to the fruit and vegetables to grow and they gladly obeyed. He shooed away the pests and they simply found other unprotected gardens to feast on. O.k, so maybe I wasn't that naive but that was the kind of gardener I wanted to be.  I thought the plants and the weeds and the critters and I could all live happily together with little more than a sprinkler for them and an ice tea for me. HA!

I now see God differently than before but I love the image of my heavenly Father as the gardener  even more. This is what I have learned from growing my own grapes. 

Growing Grape Vines takes WORK. 
Not back breaking dangerous work but it takes constant diligence and watchfulness.  Every evening we had to go out (I, with my bucket of soapy water, my husband with his bare hands, ew!) and remove every beetle, larva and egg.  Even though they only ate the leaves most of the times they would bring birds to our grapes which we knew were waiting just as eagerly for the fruit to ripen as we were. We would also inspect each bunch of grapes to remove the ones that were turning brown so it would not spread. The endearing thing about this was we soon knew each cluster of grapes well. We could see daily and weekly changes that the average on looker probably would not have noticed. It is good to know that our father protects us and knows us that intimately. 


Growing Grapes is selective
The hardest thing for me as a gardener has always been pruning. I wanted to give every limb, leaf and weed a chance to prove their worth. My mother used to tell me pruning was just giving the plant a hair cut.That might be part of the problem. I can probably count on one hand how many times I was happy with a hair cut I have received. Even at the end of a successful year though I find myself wishing I had pruned back my vines a little more. 

In pruning the vines we direct more of the nutrients in the soil to the fruit. Those branches that reach for trellises where there are none only add weight to the ones that are clinging to the trellis. They don't produce fruit but they were covered in leaves which only steals energy from those branches doing all the work. 

I can't tell you how many times God has taking people out of my life that were only stealing my energy and weighing my down. I wanted so badly for them to be fruitful but were heading in the wrong direction, refusing to go where the gardener had provided the support for them. Sadly, to protect the other branches, they had to be separated from the vine.   

Growing Grapes is humbling
It addition to pruning the branches that are not producing, we had to thin the leaves pretty heavily. Grapes love air and sunlight. The giant leaves hide the grapes in shadows that cause them to rot. So even these healthy branches that faithfully abide in the vine have to give up their beautiful canopy of leaves to give light to the fruit.  This was hard for me because vines without leaves are not nearly as lush and photogenic. (Luckily, our daughter's turtle loves grape leaves for her bedding so it helped me knowing they were going to good use, hehe). 

But isn't this hard for all of us? When we do good and produce sweet fruit for God don't we want to stand in front of it for all to recognize what we did? Instead, we need to just let the light shine on the good deed to bring glory the Gardener. 


Growing Grapes is dependent on the Vine
Finally, I learned that if you accidentally remove a vine that has little grape buds on them they will not produce fruit no matter how healthy they look. They may stay green longer than any cut flower ever dreamed of but those little buds will not make sweet globes of goodness no matter the condition. Believe me, I tried. Now I have not tried grafting a branch into the vine but I hope to next year, just to see what it takes to do it. This is a metaphor Jesus uses to explain how we are adopted into the family of God and made heirs of His treasures. But one thing is certain the branches are not much without the life of the vine and the care of the gardener. 

These are all things I understand a little better now from growing grapes. I also know now how much I love fresh grapes and grape jelly. I never liked it much from the store because it was so full of sugar. Our homemade jelly is so much more complex and interesting with it's natural sweetness and delicate twang of wine and a real appreciation of the attention that went into each bundle of deep purple jewels. 

I hope this is how God someday sees the fruit I produce by clinging to the vine and bending to His care.   

 facebook.com/earthshaperart  etsy.com/shop/EarthshaperArts  instagram.com/earthshaper pinterest.com/EarthshaperArtsAndHomestead

Email me to discuss commissioned works of art for the home or business at

Featured Post

Month of Rest

    Oh January! Why do we expect so much from you.  I keep hearing how by January 15 th most people have already given up on their new ...